Many videos failed to rank on YouTube even though they have great content, because of the poor thumbnail. Thumbnail is a significant process to increase the Click-through rate (CTR) of the videos. To increase the views and rank the videos on YouTube search, you must need to improve the thumbnail quality on the video.
TubeBuddy is a famous tool among YouTube content creators, which is a YouTube certified, browser-extension, and channel management tool. When it comes to standing steady on YouTube SEO, then TubeBuddy is the most needed tool.
Well, with the help of TubeBuddy, you can able to make attractive thumbnails inside the YouTube interface itself. No need to come out of YouTube. In addition to that, it’s free to create. So, in this post, we’ll see how to make a YouTube custom thumbnail with this tool.
Before that, I hope you already installed TubeBuddy on your browser. In case, if you’re new to hearing about this tool, then read everything regarding this tool here. If you haven’t installed it, then click the below button,
How to Make YouTube Thumbnails: A step-step Guide
Follow the below steps to create and add a thumbnail for your video. To be frank, you need to worry about the thumbnail size, style, resolution, and so on. But from the TubeBuddy thumbnail maker, there is no need to bother about it.
However,
- The best YouTube custom thumbnail size is 16:9 aspect ratio
- Thumbnail resolution on YouTube is 1280X720
When you’re using TubeBuddy, it takes care of everything about the size and resolution.
For video information: https://youtu.be/oVnILqIhHk8
If you want to watch the video tutorial, then check out the above video. Otherwise, continue reading.
Step 1
Go to YouTube Studio > Videos > edit the video which you want to create the thumbnail. In the video details page, click the “CREATE THUMBNAIL” button (if you installed TubeBuddy, it shows).

Step 2
And it will take you to the “Thumbnail Generator” page. On the left side, TubeBuddy shows the actual thumbnail, which is selected default on YouTube.

To make thumbnails on YouTube, TubeBuddy split the processes into three levels. They are,
- Background – Enables you to add custom thumbnail background or frame from the video.
- Layer – Add Text, emoji’s, images to the thumbnail layer.
- Preview – Preview your thumbnail of how it looks on YouTube, Facebook, and Twitter.
We’ll discuss each section one by one in the below.
Background
Background section lets you add the background image of your video thumbnail. It allows you to add a solid background colour (or) your own image (or) the stills from the video frame.
Use the stills from the video frame option, if the video has any funny or interesting moments. In case, if you’re uploading your own background images means, then upload it in the resolution of 1280X720.
For the sake of this tutorial, here I’m using the below background image (Refer the below image).
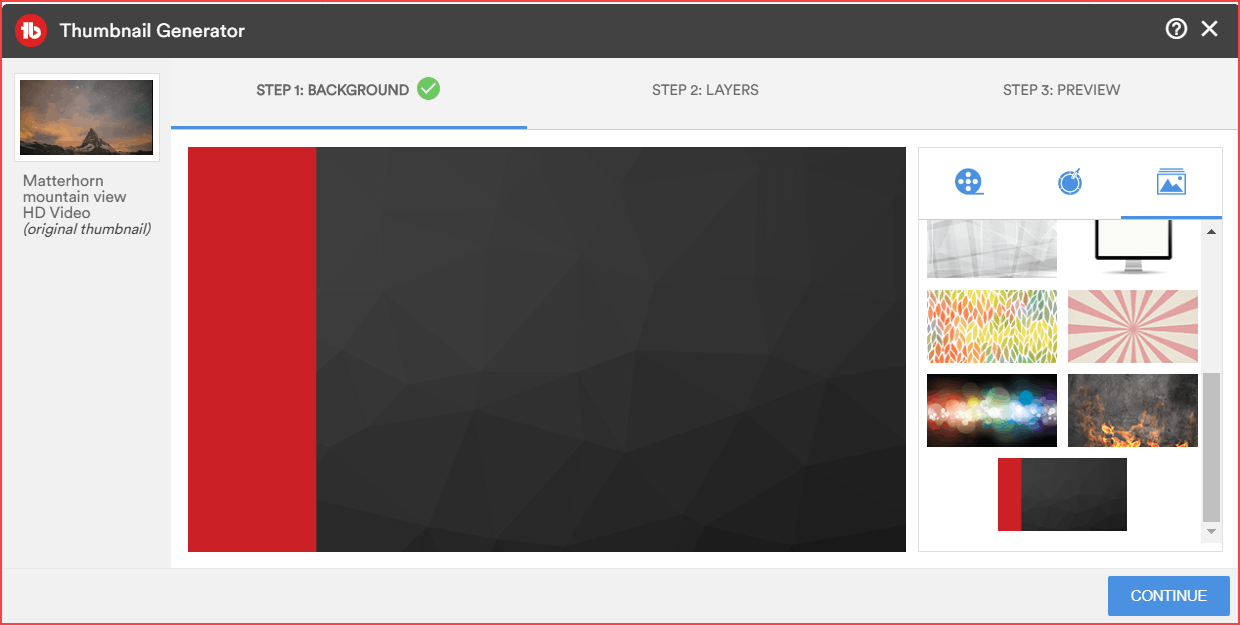
The above background image provided by TubeBuddy is a little awesome and it attracts me. Hence, I used this image. Once you choose the background, click the “CONTINUE” button.
Layers
Now in the “Layers” section, it allows you to add texts, emoji’s, images, frame, and template. This is the place, where you need to showcase your hands-on effects.
Here, I’m adding texts, images to build a better thumbnail. When you make thumbnails, try to use big fonts and highlight the attracting layers. For example, if you’re making any tutorial video, if the tools are free to use, then mention the word “Free” little bigger than others.
From TubeBuddy custom thumbnail makers, it’ll let you add different font size from “XS” to “XXXL”. In addition to that, it has different fonts to use and in case if you want to upload any of your own fonts, then it’s also possible.
So, here I’m making the layer from the selected background image, (Check out the below image)
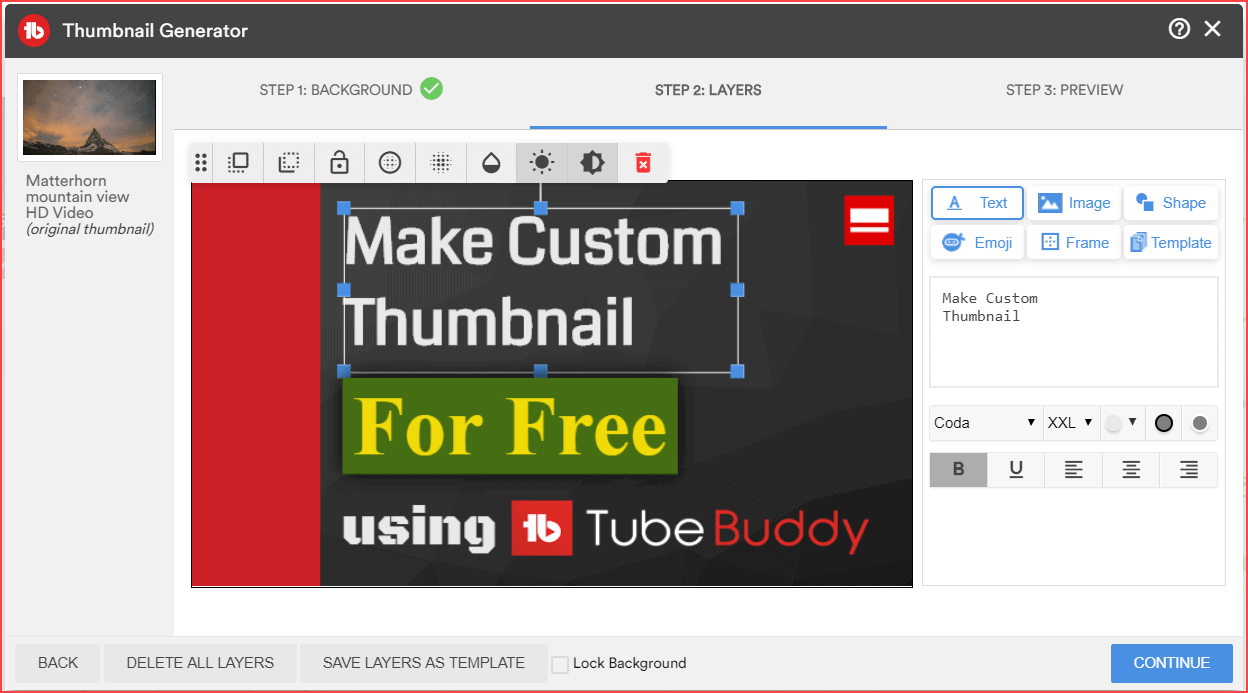
Kindly choose the best things among these options and use them on the thumbnail. For instance, you want to save the thumbnail template for future videos, then click the “Save Layers as the Template” button at the bottom of the page.
But for the TubeBuddy premium account holders only can able to use this option. Don’t worry, anyhow you are allowed to create the thumbnail and use it on your videos in the free account itself.
Once you’re ok with your design, then move on the preview page.
Preview
The final part is the thumbnail preview option on different platforms. Make sure that the thumbnail is visible enough on all the devices. As I said before, use the text little bigger to read and also visible on any device.

Finally, if you’re satisfied with your thumbnail image, then click the “Save & Publish” button. Moreover, take a look out the thumbnail tips provided by TubeBuddy on the right side and follow it.
TubeBuddy also lets you, download the created thumbnail images, hence you can use that on any other social media profiles. So, I hope you have at least a basic idea to create a custom thumbnail on your video. Here, I would like to provide some basic thumbnails tips to get more clicks to the videos.
Best Tips to make YouTube Thumbnails
- Thumbnail Image size and shapes are important.
- Highlight and enlarge the words like “Free”, “Tips”, “Discount”, “Offer”, and any other words related to creating curiosity.
- Use your channel icon in the thumbnail image.
- Try to apply the same fonts, colours all over the thumbnails on your channel.
- Follow the same template to your entire channel videos.
- Don’t use Clickbait thumbnails, which will create a bad impact on your audiences and also affects your YouTube video SEO.
- If you’re using the human faces, then take a separate photo session for thumbnails.
- Use effective YouTube thumbnail makers like TubeBuddy.
FAQ’s
1. Go to My videos.
2. Select and edit the video, which you want to add a thumbnail.
3. Click the “Upload thumbnail” button and choose the image to add.
4. Finally, click the “Save” button.
Conclusion
Follow the above tips to make the best thumbnail on your video. Every small thing is matter to increase the views on the videos. But custom thumbnails play an important role in it. Massive results are the by-product of small, small things.
As a result, I hope you understand, how to make YouTube thumbnails for your videos. Now I’d like to hear from you. Comment here if you have doubts about the thumbnail process. Share this post on your Twitter page.
Also Read,
- How I increase my traffic by 50K views in 30 days?
- Easy guide to make YouTube thumbnails
- How to add watermark subscribe button on your YouTube video?
Sharing is caring!